HOW TO PERFORM REVERSE CRUNCHES CORRECTLY
The Reverse Crunch exercise is an excellent lower ab, bottom-upward movement that can help you develop those lower abs better… but only if you do it the right way.
Just like a lot of other popular exercises, the Reverse Crunch is often performed incorrectly, turning it into a weird type of spine crunch.
Whether it’s using bad form or the wrong type of crunch, the result is the same: no gains and no lower abs.
There are a lot of ways to do the Reverse Crunch – with straight legs or bent legs, for example – but which is the best way?
Today, I’m going to take you through the muscles that are targeted by the Reverse Crunch, how to do the Reverse Crunch, and the most common mistakes I see guys making in the gym.
I’ll also take you through a full list of Reverse Crunch variations to give you plenty of variety in your core workout.
REVERSE CRUNCH: MUSCLES TARGETED
Before we dive into how to do the Reverse Crunch exercise, I want to talk about the muscles that are activated.
Understanding the muscles you’re about to target can make all the difference in how effective your workout is.
When you know which stomach muscles you’re engaging and how they function, you can focus on the correct movement and form.
This will ensure you get the most out of every rep while minimizing the risk of injury.
Here are the major muscle groups that the Reverse Crunch targets:
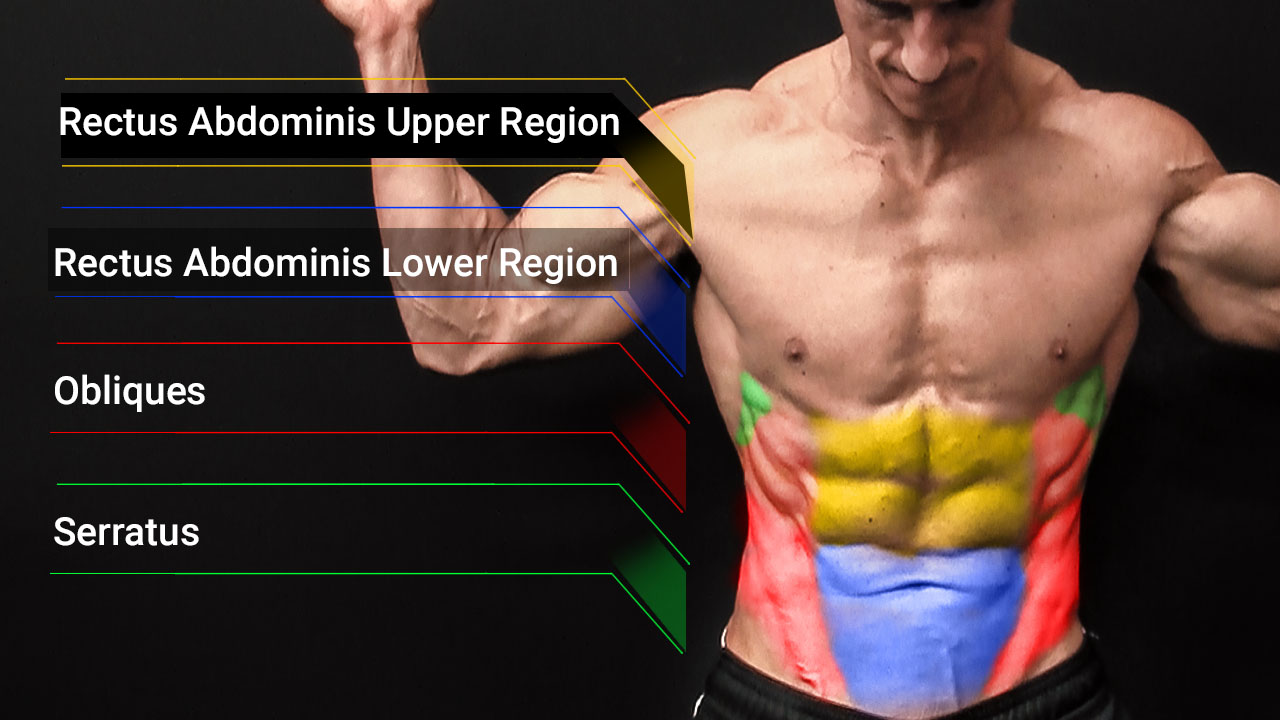
RECTUS ABDOMINIS

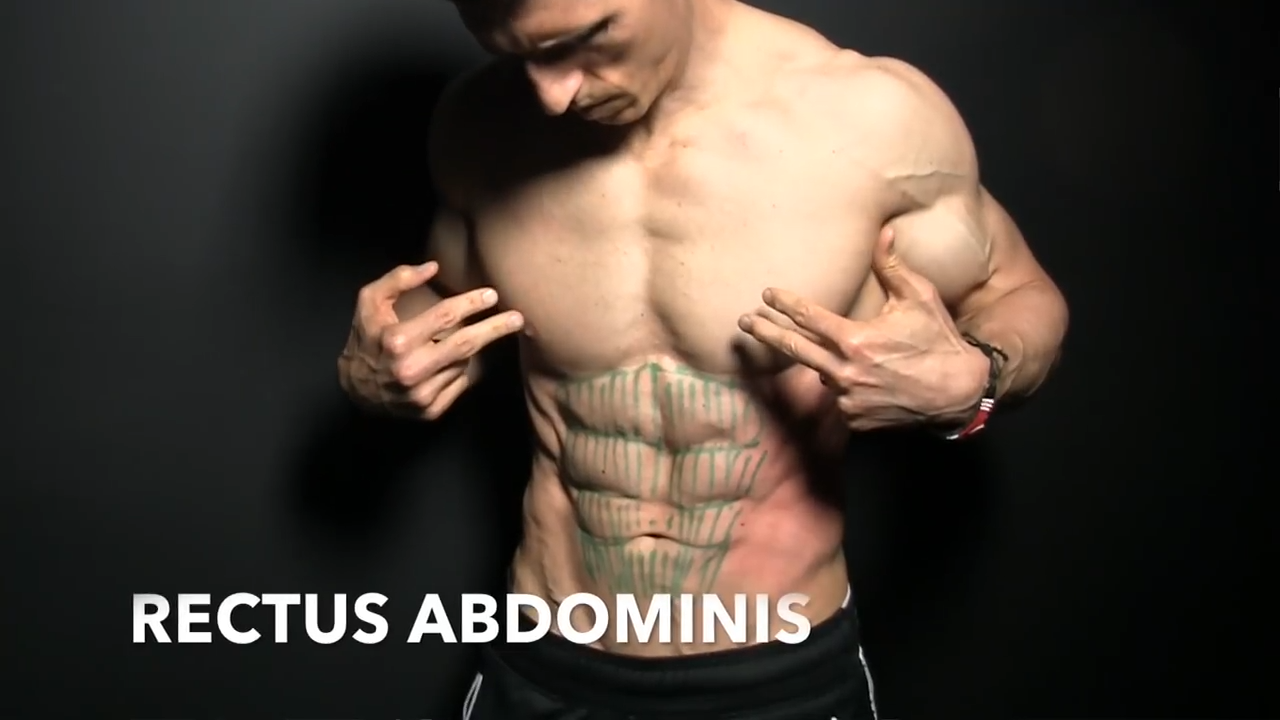
The rectus abdominis is the muscle behind those coveted six-pack abs. But it’s not just about looks—this muscle is crucial for your core strength and stability.
The rectus abdominis starts from the lower part of your pelvis and runs straight up the front of your body to just below your chest, connecting your hips to your ribs.
The muscle’s main job is to flex the lumbar spine, which is what happens during a crunch or sit-up.
This muscle is essential for movements like the Reverse Crunch and Traditional Abdominal Crunches, and it plays a vital role in stabilizing your pelvis and lower back. This helps maintain good posture and prevent injuries during heavy lifts.
Additionally, the rectus abdominis aids in forceful exhalations, engaging every time you breathe out hard, whether lifting weights or sprinting.
EXTERNAL OBLIQUES

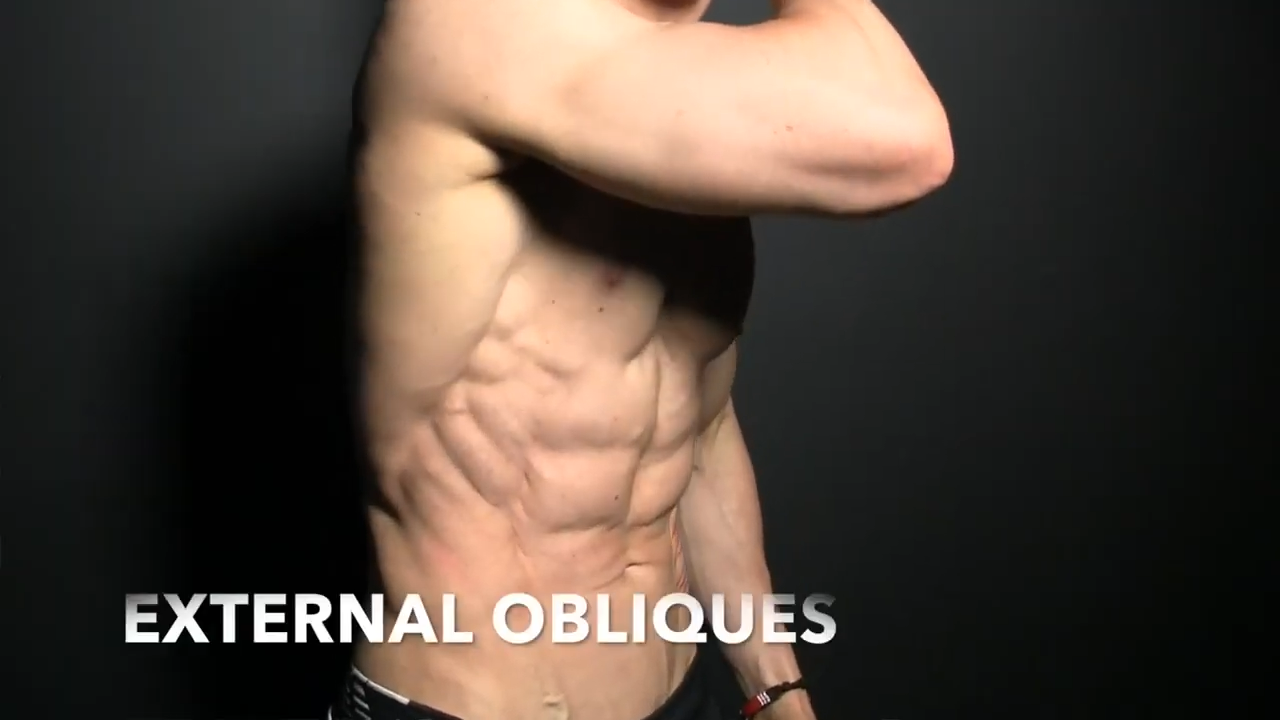
The external obliques are a key part of your core muscles that often get overlooked in favor of the more popular outer, six-pack muscles like the rectus abdominis.
These oblique muscles run along the sides of your abdomen and are crucial for a strong core and effective abs workout.
The external obliques originate from the lower eight ribs and run diagonally down and forward to attach to the iliac crest of your pelvis. This placement allows them to play a significant role in various movements and exercises.
When you perform a crunch, especially Crossover Crunches or Bicycle Crunches, the external obliques are heavily involved in the twisting motion, helping to rotate your torso and stabilize your core.
In terms of function, the external obliques are responsible for rotating the trunk and bending it sideways, which is essential for movements like the Reverse Crunch and Basic Crunches.
They also aid in flexing the spine when both sides contract together, similar to the action during a standard crunch or abdominal crunch exercise.
Additionally, these abs muscles help stabilize the pelvis during lower-body motion and maintain proper form during intense popular workouts.
INTERNAL OBLIQUES

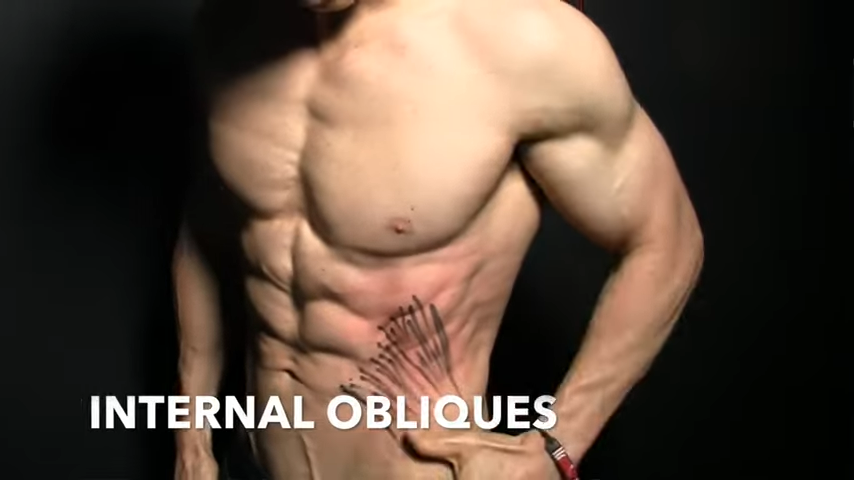
The internal obliques work in tandem with the external obliques to provide stability and strength to your midsection, making them essential for effective abs workouts and overall body strength.
The internal obliques originate from the iliac crest of your pelvis and the inguinal ligament. They run diagonally up and forward, attaching to the lower ribs and the linea alba, a fibrous structure that runs down the midline of your abdomen.
This muscle placement allows the internal obliques to be heavily involved in a variety of core workouts and movements, including Crunches, Reverse Crunches, and Bicycle Crunches.
Functionally, the internal obliques are responsible for rotating the trunk and bending it sideways. When you perform Crossover Crunches or Bicycle Motion Crunches, these muscles contract to help twist your torso.
They also assist in flexing the spine during standard crunches or abdominal crunch exercises, working alongside the rectus abdominis and external obliques to stabilize your core.
This stabilization is crucial for maintaining proper form and preventing injuries during heavy lifts and intense workout moves.
TRANSVERSE ABDOMINIS (CORE STABILIZER MUSCLES)

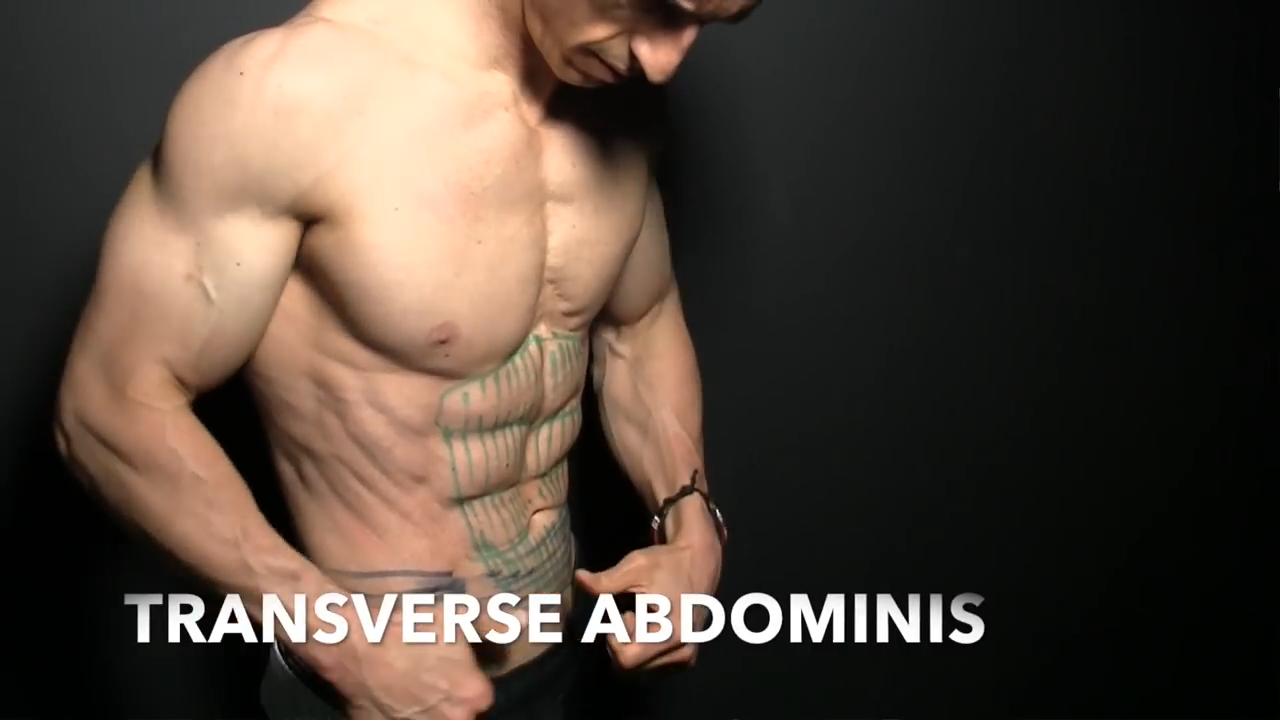
The transverse abdominis is the deep core muscle that’s often overlooked but absolutely essential for a strong, stable core.
Think of this muscle as your body’s natural weight belt, wrapping around your midsection and providing critical support during your workouts and daily movements.
The transverse abdominis originates from the iliac crest, the lower ribs, and the thoracolumbar fascia, and it inserts into the linea alba and the pubic crest.
This muscle runs horizontally across the abdomen, which is why it’s sometimes referred to as the “corset muscle.” Its unique positioning makes it crucial for stabilizing your core, especially during heavy lifts and dynamic movements.
The transverse abdominis is responsible for compressing the abdominal cavity, providing stability to your spine and pelvis.
This muscle is engaged during almost every core workout, whether you’re doing traditional Crunches, Reverse Crunches, or more dynamic exercises like Bicycle Crunches.
It’s the muscle that helps you maintain proper form throughout the entire movement, ensuring that your core remains strong and stable.
SERRATUS ANTERIOR

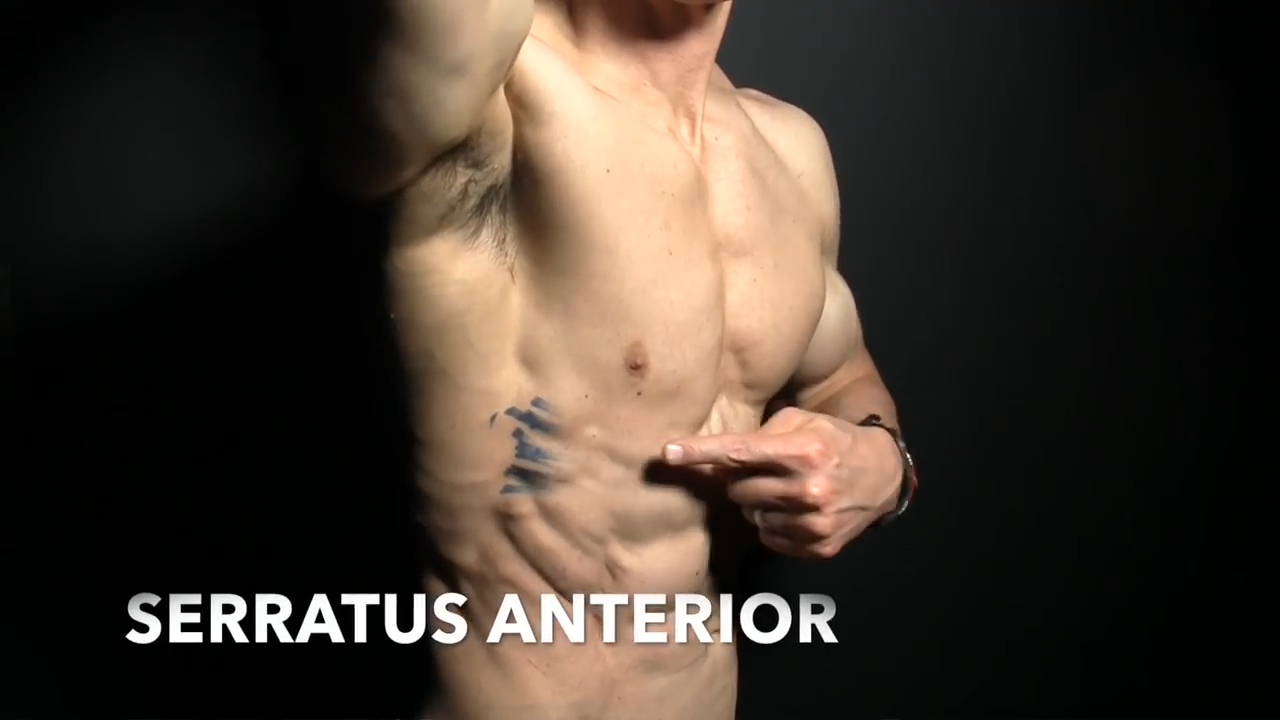
The serratus anterior is an ab muscle that many people completely overlook, or worse, don’t even realize exists.
This muscle is essential not just for aesthetics but for functional strength, especially when you’re pushing your limits in the gym.
This muscle looks like the teeth of a saw, which is why it’s often referred to as the “boxer’s muscle.”
It’s heavily involved in movements that require pushing, making it crucial for exercises like Push-Ups, Bench Presses, and Overhead Presses.
The serratus anterior is responsible for the protraction and upward rotation of the scapula. This means it helps move your shoulder blades forward and around your rib cage, which is essential for a full range of motion during pressing movements.
It also stabilizes the scapula, preventing winging of the shoulder blades, which is vital for maintaining proper form and preventing injuries during heavy lifts.
HOW TO DO THE REVERSE CRUNCH
Now that you know which muscles to focus on during the Reverse Crunch, I want to move on to showing you how NOT to do Reverse Crunches.
You see, it’s easy for me to tell you how to do the exercise, but I think it’s just as important to make sure you’re going through your exercise arsenal and throwing out incorrect or potentially harmful exercises.
I guarantee this way of doing the Reverse Crunch is going to look familiar (maybe you even do crunches like this!).
Starting today, you need to avoid doing Reverse Crunches like this:
PUTTING YOUR HEELS TOO FAR BACK

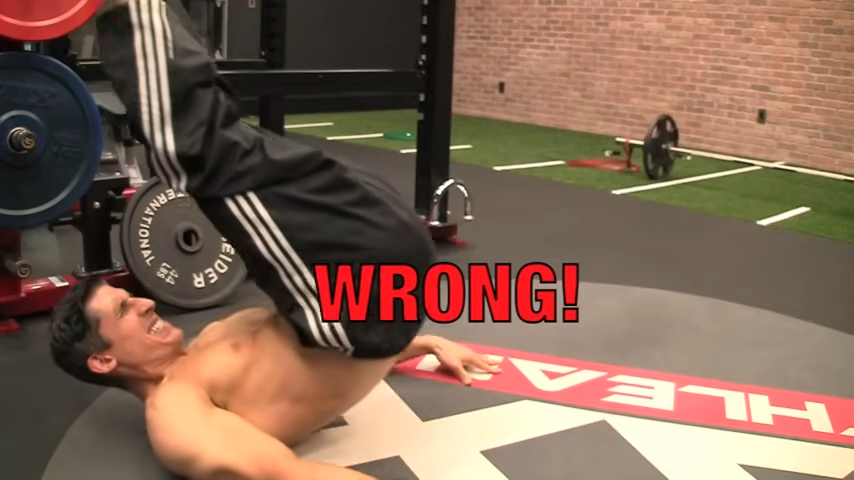
During this type of Reverse Crunch, you’re actually making the exercise the easiest at what’s supposed to be the hardest point in the range of motion.
When you get to the top of what we like to call the “Heels to the Heavens,” you really should be trying to press your heels directly up into the ceiling.
But if you allow your heels to go past that point – past vertical – where they’re over your head, now gravity is helping you.
It’s pushing your legs back in that direction and taking all the work off of the abs.
If you want this exercise to stay focused on the lower abs (which you absolutely should), then you want to stop your heels at vertical, in terms of how far back you go.
USING TOO MUCH MOMENTUM

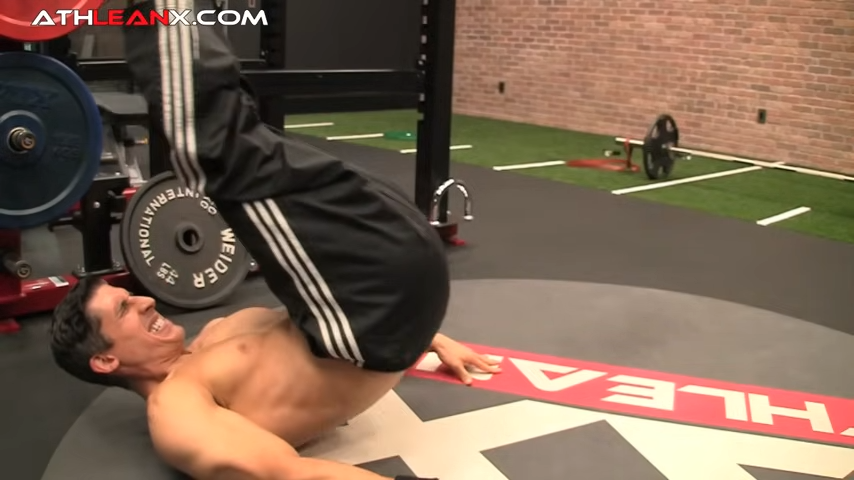
There’s a whole lot of momentum being used in this exercise because we can rock on our tailbones and pelvis, generating backward momentum.
But the goal here, guys, is never just to hit a certain number of reps—it’s to do it the right way.
Even if you significantly cut down your reps by following the proper form I’m showing you today, you’ll get better engagement from your abs, which is the whole point.
Avoid using excessive momentum where you’re just pulling the weight of your legs back, letting it help you get up, and then not controlling them on the way back down.
Control and precision are key to maximizing your ab workout.
SHORTENING OF THE LEGS

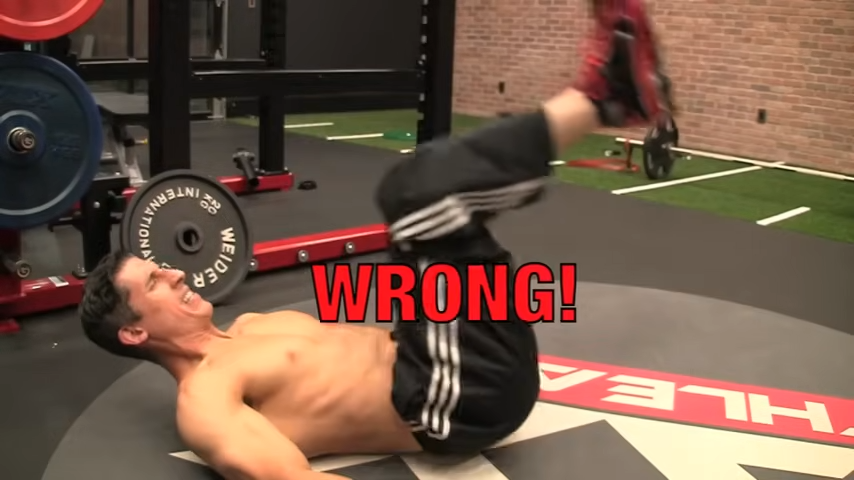
Another common mistake you’ll see is the shortening of the legs, which happens as an automatic compensation.
Remember, our bodies are designed to find the path of least resistance, but taking the easy way out won’t help you challenge and change yourself.
When I bring my feet up towards the top, everything looks good. However, when I lower my legs back down, I might bend my knees to avoid controlling the full weight of my legs against gravity.
This makes it easier, as bending the knees reduces the weight being managed.
For example, if my legs weigh 50 pounds each, bending them might reduce the effective weight to 25 pounds each.
This creates the illusion of doing the exercise correctly when, in reality, I’m just using less effort.
To make the reverse crunch truly effective, you need to maximize the length of your legs on the way down. Straighten your legs and contract your quads to increase the weight your lower abs have to handle.
HOW TO DO REVERSE CRUNCHES CORRECTLY
Now that you know how NOT to do Reverse Crunches, it’s time to learn how to perform this exercise the right way.
Here’s a step-by-step breakdown of how to do Reverse Crunches with correct form and execution.
REVERSE CRUNCH

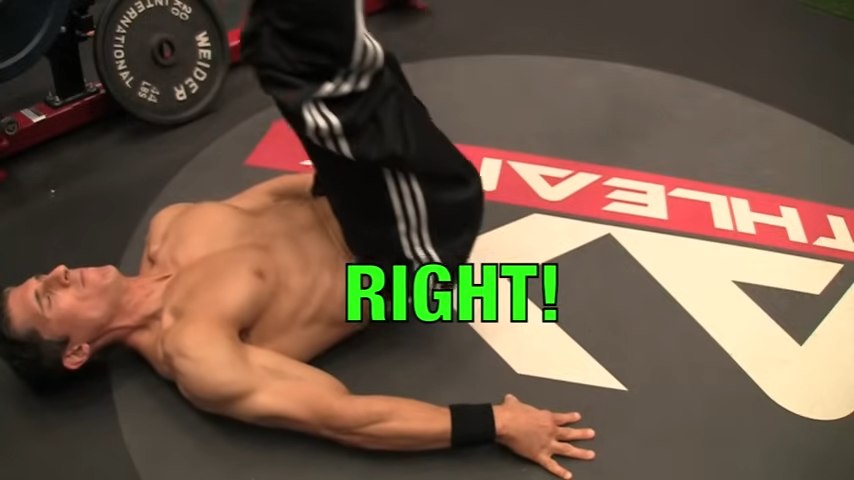
HOW TO DO THE REVERSE CRUNCH:
- Start by lying flat on an exercise mat with your knees bent at a 90-degree angle and your calves parallel to the floor. Keep your hands by your sides or under your hip muscles for support.
- As you begin, straighten your legs, making sure your legs are as straight as possible throughout the movement.
- Focus on lifting your hips off the ground by contracting your lower abdominal muscles. Avoid using momentum—this isn’t about swinging your legs or rocking back and forth.
- When lifting your legs, aim to bring your heels back until they are vertical, ensuring you’re targeting the rectus abdominis and transverse abdominis effectively.
- Control is crucial. Slowly lift your hips towards your chest, curling your pelvis up, and hold at the top for a moment to engage your core muscles fully.
- Lower your hips back down slowly, maintaining control throughout the entire motion. Don’t let your legs drop all the way to the ground; keep them in that contracted position to maintain tension on your abs the entire time.
- Remember, the goal is quality over quantity. Aim to perform this exercise for 8-12 crunches (or as many as you can with perfect form), focusing on the contraction and keeping your form tight to avoid neck pain and ensure a strong core.
- For added intensity, you can hold a medicine ball between your knees or use a decline bench to increase the challenge.
WHAT MAKES IT EFFECTIVE: Try to resist the urge to let your legs touch the ground. Instead, stop the downward momentum and use a strong contraction of your abs to lift your legs back up. This approach is similar to a plyometric exercise, as you quickly transition from the eccentric to the concentric phase, minimizing the transition time. Incorporate this technique into your routine, and you’ll feel a much stronger engagement in your abs, especially during this movement.
REVERSE CRUNCHES: COMMON MISTAKES
I discussed three types of Reverse Crunches that you don’t want to do, but I want to continue that idea with some other common mistakes that I see when guys perform this exercise.
The following common mistakes can prevent you from getting the most out of your workout and even lead to difficulty with neck discomfort, neck pain, or other injuries.
By avoiding these common mistakes and focusing on proper form, you’ll get more out of your Reverse Crunch workout.
Incorporate these tips into your routine to ensure you’re maximizing the benefits and building a strong, stable core.
NECK STRAIN
A frequent error is straining your neck during the movement. To prevent neck pain, keep your neck in a neutral position throughout the exercise.
Avoid pulling on your head or neck with your hands to avoid neck injuries.
Your neck should remain relaxed, with the motion coming from your abdominal muscles and not your upper body.
LIMITED RANGE OF MOTION
Many people do not use the full range of motion, limiting the effectiveness of the Reverse Crunch.
Make sure to lift your hip level high enough off the exercise mat and control the downward motion.
This ensures your rectus abdominis and transverse abdominis are fully engaged.
INCORRECT LEG POSITION
Continuing with the point above, it’s important to keep your legs as straight as possible during the Reverse Crunch.
When you lift your legs, aim to bring your heels back until they are vertical.
This positioning helps in effectively targeting the lower abs and ensures a full range of motion.
Avoid letting your legs drop completely; maintain tension in your abs the entire time.
NEGLECTING CORE ENGAGEMENT
Another common mistake is not fully engaging the core muscles. Focus on contracting your abs and maintaining that tension throughout the entire movement.
This not only targets your abs more effectively but also builds a strong core.
Ensure your belly button is drawn in towards your spine to maximize muscle activity.
IMPROPER BREATHING
Proper breathing is something that most people skip during the Reverse Crunch.
Exhale as you lift your hips and inhale as you lower them.
This breathing technique helps maintain a controlled motion and ensures your core muscles are properly engaged.
RUSHING THROUGH REPS
Speeding through reps can compromise your form and reduce the effectiveness of the exercise.
Focus on slow, controlled movements.
Take your time to perform each rep correctly, ensuring that your abdominal muscles are doing the work, not momentum.
Don’t worry about setting high numbers. Aiming for 8-12 crunches with perfect form is totally acceptable.
INCONSISTENT FORM
Overall, one of the biggest pitfalls in performing the Reverse Crunch is inconsistent form. Adjustments based on your individual fitness level are crucial to maximize the benefits and prevent injuries.
Depending on your fitness level, you may need to modify your Reverse Crunch technique.
Beginners might struggle to maintain straight legs throughout the movement so it’s okay to start with slightly bent knees and work towards the correct form as your strength improves.
Keeping your abdominal muscles engaged throughout the entire movement is key to maintaining proper form and avoiding unnecessary strain on your neck and lower back.
Using a decline bench or incline bench can add variety and a higher intensity level to your workouts.
A decline bench increases difficulty by adding resistance, making your lower abs work harder.
An incline bench can help beginners focus on mastering the correct form and motion with reduced intensity.
Whether on a bench or exercise mat, maintaining proper form is crucial. Ensure your movements are controlled and avoid using momentum.
Lift your hips using your core muscles, not your legs.
Keep your neck in a neutral position to avoid neck pain and draw your belly button in towards your spine to engage your transverse abdominis and rectus abdominis muscles.
REVERSE CRUNCH VARIATIONS
Now that you’ve mastered the basic Reverse Crunch, it’s time to take things up a notch with some variations.
These Reverse Crunch variations will add intensity, target different areas of your abdominal muscles, and keep your core workouts challenging and effective.
Whether you’re looking to increase the difficulty or just mix up your routine, these variations will help you achieve a stronger, more defined core.
SWIPER

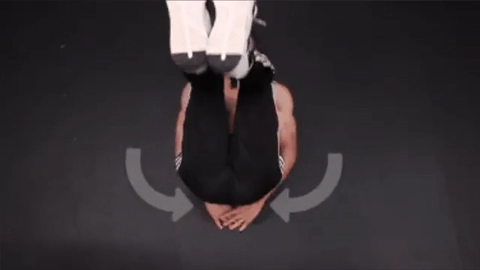
HOW TO DO THE SWIPER:
- Lie flat on your back on an exercise mat. Place your arms straight by your sides, and keep your legs extended. Your neck should be in a neutral position, and your core engaged.
- Using your lower abs, lift your hips off the ground. Focus on engaging your rectus abdominis and transverse abdominis muscles to control the motion.
- As you lift your hips, quickly swipe your hands underneath your lower back, bringing them towards the opposite side of your body. This adds an additional challenge by requiring coordination and core stability.
- As you lower your hips back down, return your hands to the outside of your body. Ensure that this motion is controlled and deliberate, avoiding any jerky movements.
- Perform this movement for the desired number of repetitions.
- Focus on maintaining proper form throughout the entire exercise, keeping your neck in a neutral position to avoid neck pain.
WHAT MAKES IT EFFECTIVE: By “swiping” your hands underneath your lower back, you give yourself a goal and a reason to get your hips up off the ground, engaging the lower abs in the process.
KNEE TUCKS

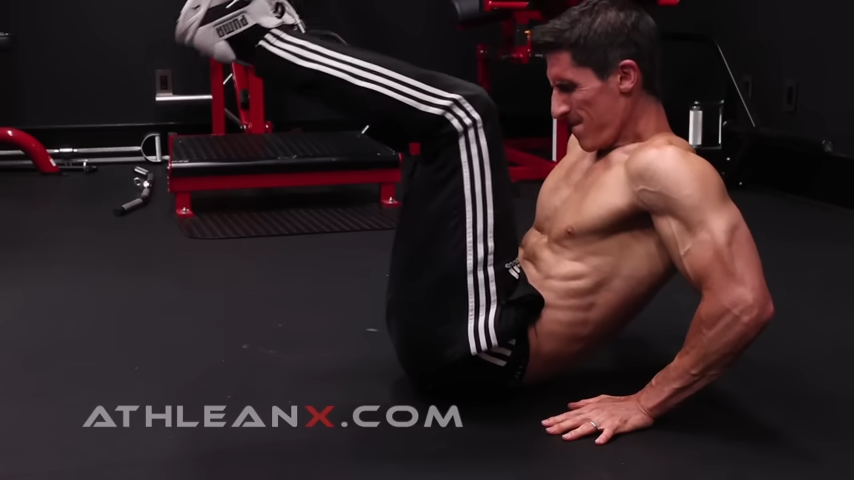
HOW TO DO KNEE TUCKS:
- Sit on an exercise mat with your legs extended in front of you and your hands placed slightly behind your hips for support.
- Your upper body should be slightly reclined at a 45-degree angle, ensuring you’re engaging your core muscles from the start.
- Begin by bending your knees and bringing them towards your chest. Keep your movement controlled and focus on engaging your hip flexor muscles and lower abs. Your knees should form a 90-degree angle as you tuck them in.
- As you bring your knees in, lift your upper body slightly to meet your legs, creating a crunch motion.
- Make sure to draw your belly button towards your spine to fully engage your rectus abdominis and transverse abdominis muscles. Avoid pulling on your neck or using your hands to assist in the movement.
- Extend your legs back out to the starting position, maintaining control over the entire movement.
- Your upper body should return to the slightly reclined position without losing tension in your core. Ensure your calves are parallel to the floor during this downward movement.
WHAT MAKES IT EFFECTIVE: Knee Tucks are an effective lower ab exercise because they specifically target the lower abdominal muscles and hip flexors through controlled, concentrated movements that engage the core and enhance muscle definition.
PLANK KNEE SLIDE

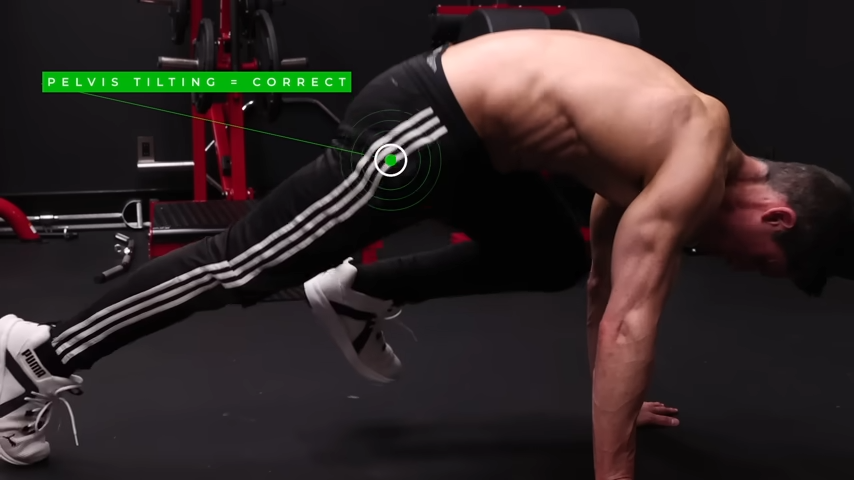
HOW TO DO PLANK KNEE SLIDES:
- Begin in a plank position with your elbows on the ground, your body in a straight line from head to heels, and your core engaged.
- Ensure your shoulders are directly over your elbows and your upper body remains stable throughout the entire movement.
- Slowly bring your left knee in towards your left elbow, maintaining the posterior pelvic tilt. As your knee approaches your elbow, slide it up along your arm. This upward leg movement helps lift your pelvis into a natural posterior tilt, engaging your lower ab fibers.
- Perform the movement slowly to ensure you’re using the correct muscles. By going slower, you can better feel the engagement of your lower abs rather than letting your hip flexors take over.
- After sliding your knee up, reverse the motion by extending your leg back to the starting plank position. Maintain control throughout this downward movement to keep your core engaged.
- Repeat the same motion but alternate knee positions with your right knee. Ensure that your hip movement remains controlled and your body stays in a straight line.
WHAT MAKES IT EFFECTIVE: The key to this exercise is maintaining a posterior pelvic tilt. This means you should tuck your pelvis under slightly to engage your lower abs and prevent overuse of the hip flexor muscles.
HANGING LEG RAISE

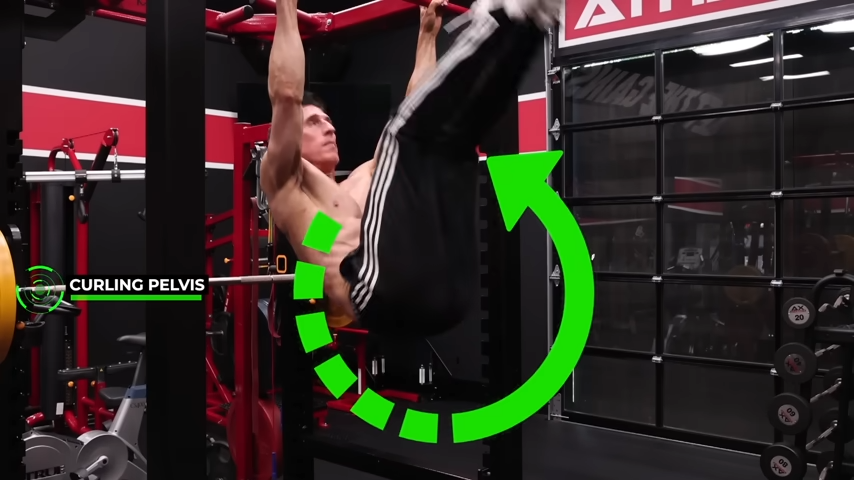
HOW TO DO THE HANGING LEG RAISE:
- Hang from a pull-up bar with an overhand grip, your arms fully extended and your body in a straight line. Your upper body should remain stable throughout the entire movement.
- Prior to moving your legs, pull your belly button in towards your spine to activate your core muscles. This will help stabilize your hips and minimize strain on your hip flexors.
- With a controlled motion, lift your legs up to the pull-up bar. Your knees should be slightly bent or straight, depending on your individual fitness level and flexibility. Avoid using momentum; focus on using your lower abs to lift your legs.
- As you lift your legs, think of performing a crunch in the air. This means curling your pelvis towards your chest, similar to the motion in a reverse crunch position. Your hip movement should be deliberate and controlled.
- At the top of the movement, pause and squeeze your lower abs. This will maximize the engagement of your rectus abdominis.
- Slowly lower your legs back to the starting position. This downward movement should be controlled to maintain tension in your abs and avoid swinging. Keeping control here prevents the hip flexors from taking over the exercise.
WHAT MAKES IT EFFECTIVE: The Hanging Leg Raise engages and strengthens the lower abdominal muscles through a controlled, full-range motion that minimizes hip flexor involvement and maximizes core stability.
HOW TO SEE YOUR LOWER ABS
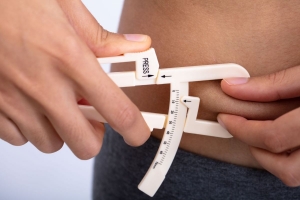
Let’s get real for a second—no matter how many reverse crunches, traditional crunches, or any ab exercises you do, seeing those lower abs comes down to one major factor: nutrition.
You can perform countless reps with perfect form and still struggle to shed that stubborn lower abdominal fat.
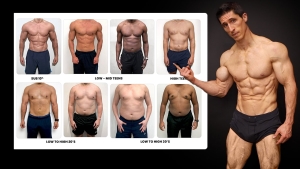
The truth is that lower abdominal fat is often the last to come off.
For most men and women, as they lose weight, they tend to drop body fat from the head down to the toes and from the toes up to the head, meeting in the middle.
This means that even as your face, neck, upper chest, lower legs, and thighs get leaner, that pesky lower belly fat can stick around.
It’s the most stubborn of all and requires getting to lower levels of body fat to finally see it disappear.
So, how do you achieve this?
You need to be in a hypocaloric state, meaning you consume fewer calories than you burn. However, this doesn’t mean you have to starve yourself or make your diet unenjoyable.
Focus on balanced, nutrient-dense foods that fuel your workouts and help you maintain muscle mass while losing fat.
Incorporating a variety of core workouts will help build a strong core, but remember, visible abs are made in the kitchen.
Ensuring proper nutrition will enhance the effectiveness of your workout moves and help you achieve that defined six-pack.
Guys, you’ve probably heard thousands of times how great the Reverse Crunch is for the lower abs and it’s true BUT here’s one of the biggest takeaways from this article:
If we work a little harder, we can shorten our workout time because we’ll get more out of each exercise.
Many people think just putting in the time will equal results, but that’s not how it works. Effort is everything, and without it, you’ll shortchange your results.
If you’re looking for a training program that covers every muscle in the body as well as the abs, we’ve got you covered. Check out our ATHLEAN-X programs to see which is the best fit for your goals and fitness level.

- Reverse Crunches are one of the best ways to target your lower abs but most people perform the exercise wrong. Here’s how to do the Reverse Crunch:
- Lie on your back on an exercise mat. Place your hands beside you or under your hips for extra stability.
- As you get started, extend your legs fully, keeping them as straight as you can throughout the exercise.
- Engage your lower abs to lift your hips off the mat. Avoid using momentum—focus on lifting through muscle contraction, not by swinging your legs. When lifting your legs, aim to position your heels vertically above you.
- Slowly lift your hips towards your chest, curling your pelvis upwards. Hold this top position briefly to maximize core engagement.
- Lower your hips back down gradually, maintaining control throughout. Don’t let your legs drop completely to the ground; keep them engaged to maintain tension in your abs.
- Remember that quality over quantity is key—each contraction should be deliberate to avoid neck strain and to build a strong core.
REVERSE CRUNCHES FAQS
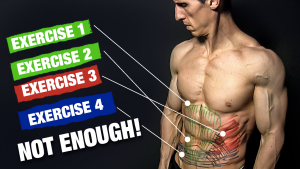
The Reverse Crunch targets your rectus abdominis, specifically the lower abs, by lifting your hips off the ground in a controlled motion.
This exercise also engages your external obliques and internal obliques, helping to define and stabilize your core.
Additionally, it works your transverse abdominis, the deep core stabilizer muscles, and even activates the serratus anterior.
Unlike a regular crunch or a crunch with shoulders lifted, the Reverse Crunch minimizes hip flexor involvement and focuses on those hard-to-reach lower abs.
By incorporating Reverse Crunches into your routine, whether on a decline bench, sit-up bench, or exercise mat, you can enhance your core stability and strength.
This move helps prevent eccentric exercise-induced muscle pain and improves performance in your other workout moves.
Keep your form tight, your movements controlled, and feel the burn in your lower abs!
Reverse Crunches are fantastic for strengthening and defining your lower abs, but it's important to understand that no specific exercise can directly burn belly fat.
Fat loss occurs through a combination of overall body workouts, proper nutrition, and maintaining a calorie deficit.
That said, incorporating Reverse Crunches into your routine, along with quicker motion exercises like Crossover Crunches and maintaining a Traditional Crunch position, can help build a strong core.
This, in turn, supports overall fitness and contributes to a leaner appearance when combined with effective fat-burning strategies.
So, while Reverse Crunches themselves don't burn belly fat directly, they are a valuable part of a comprehensive fitness plan aimed at reducing body fat.
Let’s talk about how you can avoid brutal gym workouts and perform Reverse Crunches at home effectively to target those lower abs.
Here’s how to do it right with a few tips and variations to keep things interesting.
Lie down on your back on an exercise mat. Place your hands either beside you or underneath your hips for added stability.
Straighten your legs as you start, making sure to keep them as straight as possible throughout the exercise.
Engage your lower abs to lift your hips off the mat. Avoid the temptation to swing your legs or use rocking motions; focus on pure abdominal contraction.
As you lift your legs, aim to bring your heels back until they are in a vertical position. This targets both the rectus abdominis and transverse abdominis effectively.
Raise your hips towards your chest in a controlled manner, curling your pelvis upward. Pause briefly at the peak of the movement to maximize core engagement.
Lower your hips back down slowly, keeping your movements controlled. Avoid dropping your legs entirely to the ground to maintain constant tension in your abs.
Concentrate on each contraction and keep your form precise to prevent neck pain and build a strong core.
If you’re loving the Reverse Crunch and looking for similar exercises to keep your core workouts fresh and effective, you’ve got some great options.
Here are a few that hit those lower abs hard:
Swiper: The Swiper adds an extra twist to the Reverse Crunch. While lying on your back, you lift your hips and swipe your hands under your lower back. This move demands coordination and stability, making your lower abs work even harder.
Knee Tucks: Seated Knee Tucks are another fantastic exercise. Sit on an exercise mat, lean back at a 45-degree angle, and bring your knees towards your chest. This movement mimics the Reverse Crunch while also engaging your hip flexors and lower abs.
Plank Knee Slide: The Plank Knee Slide is great for targeting the lower abs while in a plank position. From a plank, bring your knee towards your elbow and then slide it up. This move ensures that your pelvis tilts naturally, fully engaging the lower abs without overusing the hip flexors.
Hanging Leg Raise: For a more advanced option, try the Hanging Leg Raise. Hang from a pull-up bar and lift your legs to the bar. This exercise targets the lower abs and requires significant core strength and stability, similar to the Reverse Crunch.
These exercises are great alternatives to the Reverse Crunch, helping you to mix up your workouts and continue challenging your core. Incorporate them into your routine for a comprehensive lower ab workout.
REFERENCES

Jeff Cavaliere M.S.P.T, CSCS
Jeff Cavaliere is a Physical Therapist, Strength Coach and creator of the ATHLEAN-X Training Programs and ATHLEAN-Rx Supplements. He has a Masters in Physical Therapy (MSPT) and has worked as Head Physical Therapist for the New York Mets, as well as training many elite professional athletes in Major League Baseball, NFL, MMA and professional wrestling. His programs produce “next level” achievements in muscle size, strength and performance for professional athletes and anyone looking to build a muscular athletic physique.
